This is another project I undertook some years ago, under the guidance of an old friend and master woodworker
from Germany.
I started with a square, flat piece of copper about 6 inches on a side. Using a large pair of metal shears,
I carefully cut out a circle. After filing the sides to remove any burrs left from cutting it, I began to
hammer it on a soft wooden anvil, using a highly polished ball-peen hammer. Starting at the center, I would
repeatedly hammer in a spiral outwards until I reached the very edge. This not only started to shape the
bowl, but it also work hardened it. Before it could be beaten again it had to be softened; Copper, unlike
iron based alloys, is softened by quenching. I used a large propane torch to heat the copper until it turned
blue. At this point I knew that it had been heated to above it’s critical temperature. I then quenched the
copper in cool water. This left the bowl soft and malleable for further hammering. If this process is not
completed properly, and the copper stays hard for too long, the risk of a crack forming increase.
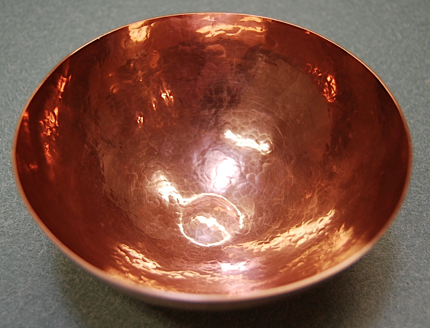 Repeating this hammering and heating process about 10 times allowed me to form it into a beautiful bowl
shape. The next step was to “seal “ the surface of the metal by lightly hammering the outside using a flat
hammer, with the inner surface resting on a highly polished convex steel anvil. This “sealed” the inside at
the same time as I “sealed” the outside. This gives it the nice shiny, beautifully faceted surface it ends
up with. I sanded the top rim of the bowl to make a nice level top. I would check this by setting the bowl
upside down on a piece of marble and try to slide a piece of paper under the rim.
Repeating this hammering and heating process about 10 times allowed me to form it into a beautiful bowl
shape. The next step was to “seal “ the surface of the metal by lightly hammering the outside using a flat
hammer, with the inner surface resting on a highly polished convex steel anvil. This “sealed” the inside at
the same time as I “sealed” the outside. This gives it the nice shiny, beautifully faceted surface it ends
up with. I sanded the top rim of the bowl to make a nice level top. I would check this by setting the bowl
upside down on a piece of marble and try to slide a piece of paper under the rim.
The only thing left to do was form the small bump in the bottom to allow it to stand upright. This was done
with the ball-peen hammer, holding the bowl upside down.
To remove scratches and tarnish, I polished it through progressively finer grit copper polish.